


You sit down at the piano to play your favorite piece, possibly Beethoven’s Für Elise or Scott Joplin’s The Entertainer. You’ve been practicing so much, but from the very first notes your fingers feel like they’re moving through wet cement. Sound familiar? It’s something all pianists have to contend with, no matter how experienced they are. Fortunately, there are many strategies for how to improve piano finger speed and dexterity, and these techniques work equally well for both beginners and experienced musicians.
With Hoffman Academy Premium you’ll learn all the techniques you need to play piano with speed and proficiency. Sign up today and see for yourself!
What causes slow or uneven finger movement?
Before learning to improve piano finger agility, it helps to understand what’s holding your fingers back in the first place.
Mother Nature
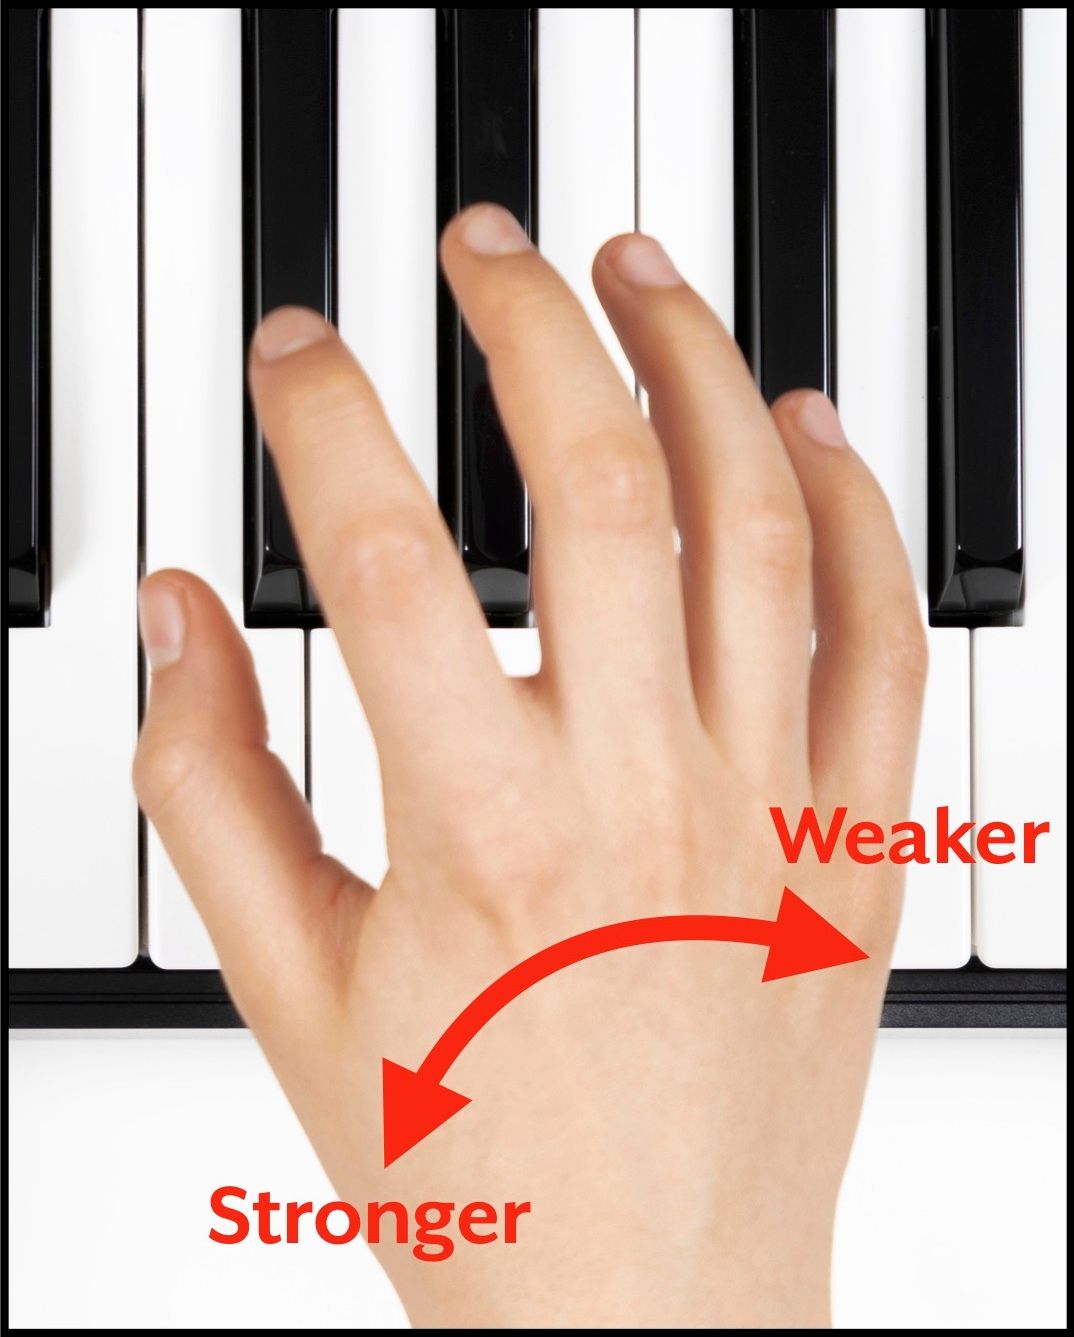
The hand’s design itself can inhibit finger speed. The thumb, index, and middle fingers are naturally the most agile and independent, while the ring and little fingers are weaker and share tendons. This inequality is further reinforced by our daily activities, most of which don’t require the weak fingers to catch up to the strong ones.
Too much wrist tension and not enough gravity
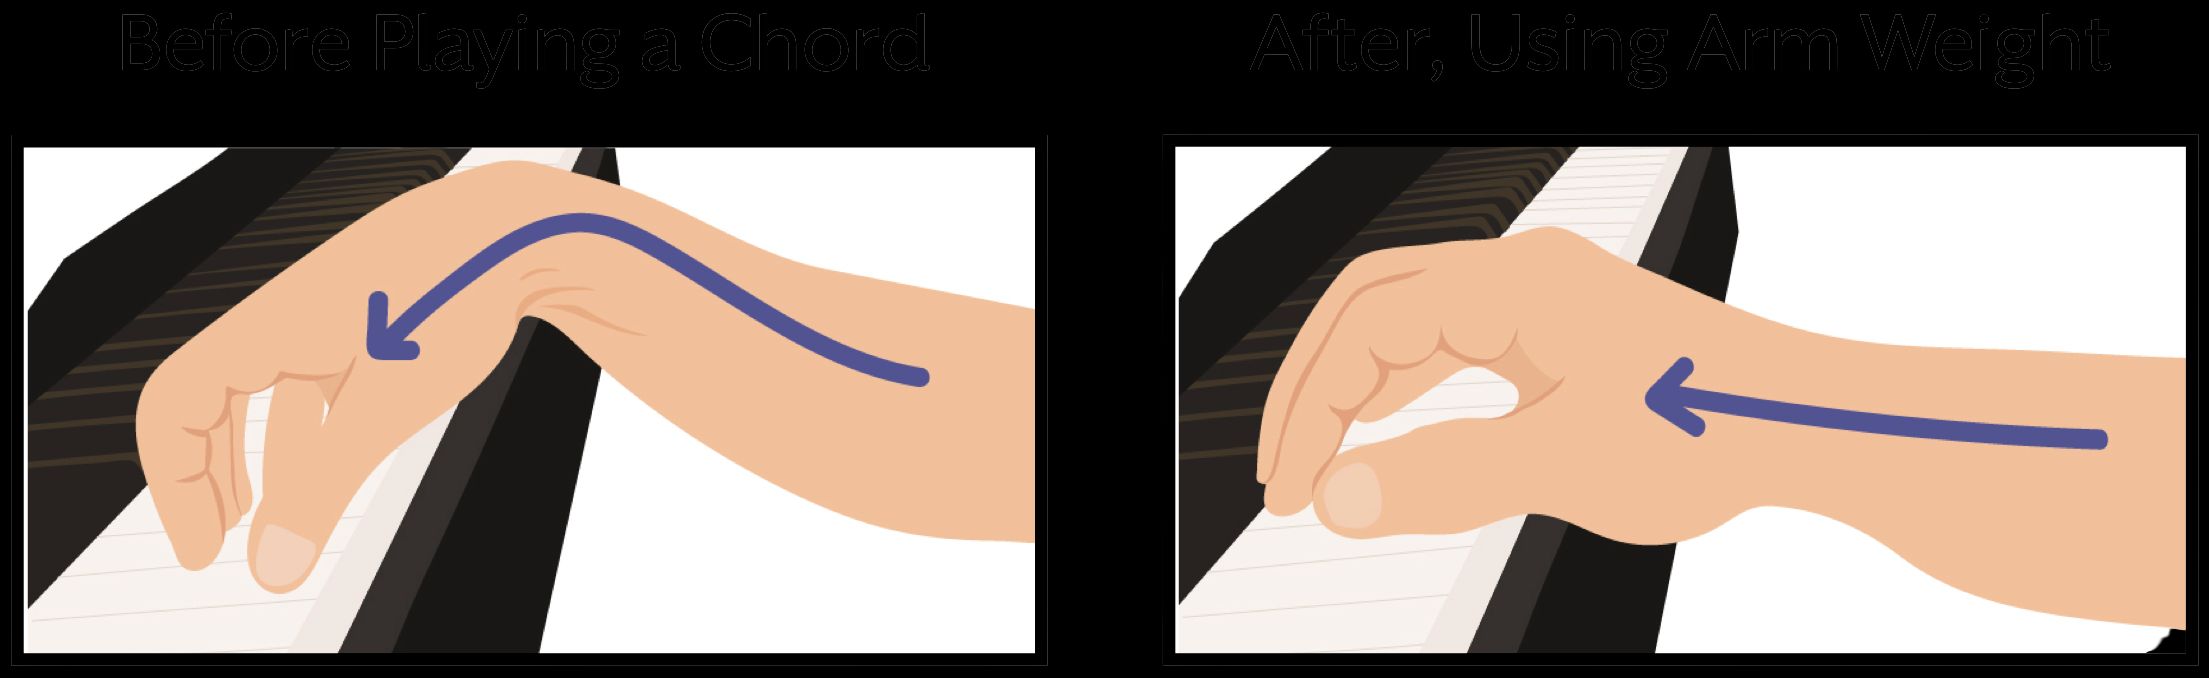
Beginners often try to make their fingers do all the work. Instead, the wrists and arms should assist in pressing downward on the keys. This only works if the wrist is loose and relaxed, and if you take advantage of gravity. Chords are best played by using arm weight, so that there’s no need to tighten the wrist and press the fingers down. Dropping downward onto the keys with a loose wrist is also essential for helping individual fingers play with even movement.
Poor hand alignment
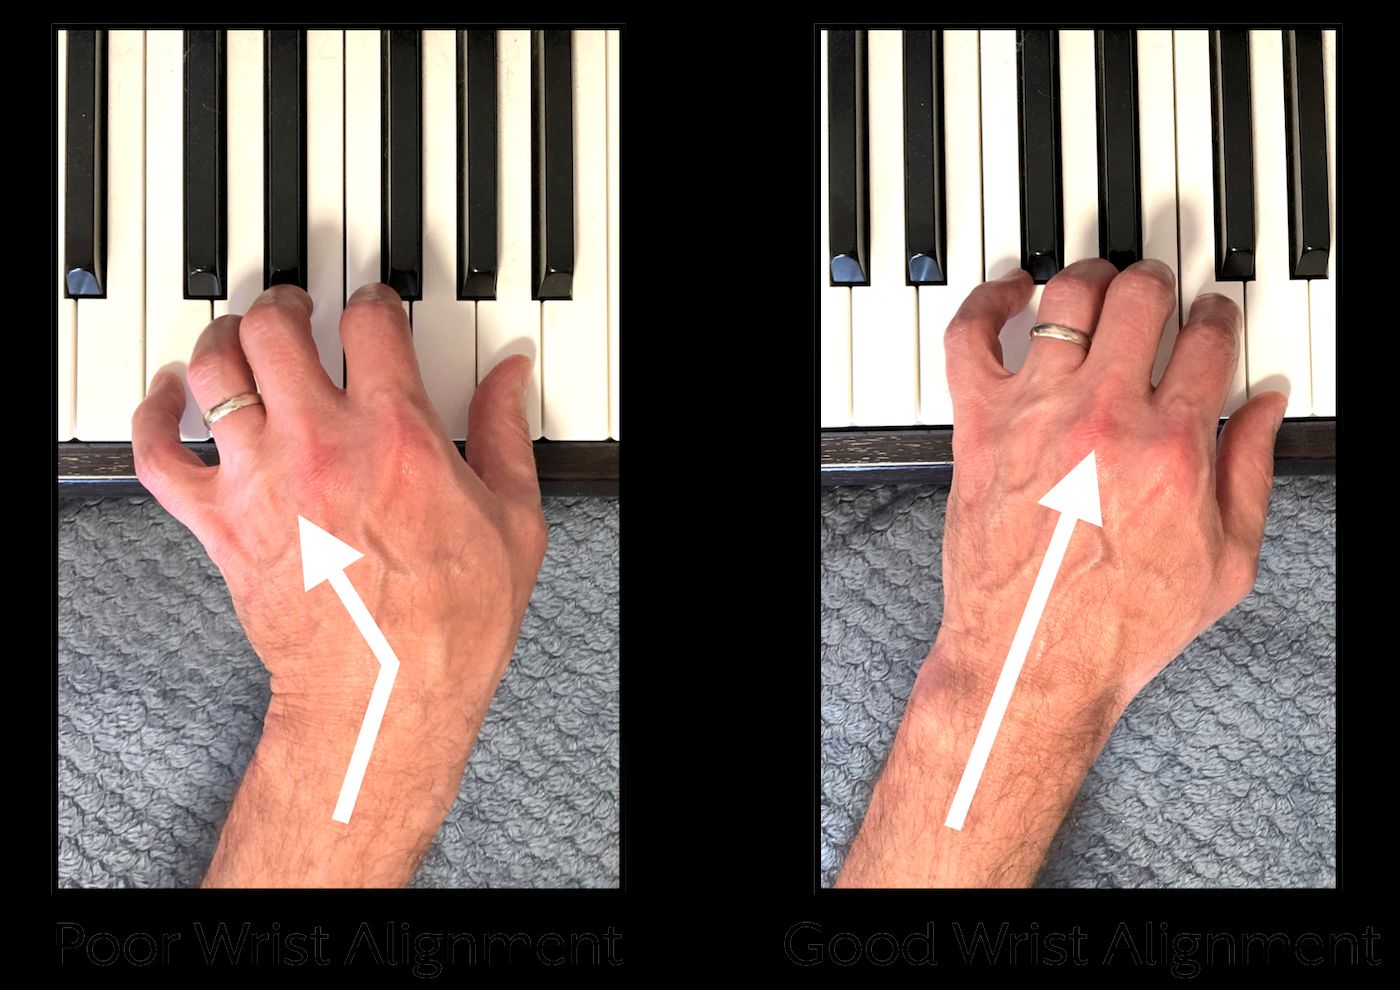
The hand should extend straight from the forearm whenever possible. If the player twists the hand outward, the alignment with the forearm is poor and it places strain on the wrist. This is another common hindrance to finger agility.
How to improve piano finger speed and dexterity: should I isolate weak fingers while practicing?
Your palm and forearm contain all of the muscles that control your fingers. For this reason, improving agility is less about finger strength and more about control and evenness of motion. With this in mind, avoid exercise equipment that claims to isolate fingers from the rest of the hand with resistance training. It’s unnecessary, and it can harm your fingers by overextending the ligaments. Conditions like tendonitis and carpal tunnel syndrome can be exacerbated by improper exercise of the hand and wrist. Never play through any pain or discomfort, no matter how subtle. Being a musician is a form of athleticism, and only by respecting the body’s natural design can you get the best performance.
Practice tempo vs. performance tempo
First, no matter what music you’re working on, slow down. A slow practice tempo gives the fingers a chance to build up not only muscle memory but also the relaxation that paves the way for faster playing. Imagine you’re working on this notorious passage in Beethoven’s Für Elise:

Many students attempt these right hand 32nd notes at full tempo before they’re ready. The result is that they either have to slow down within the first few beats, or tighten up the wrist in an attempt at control. When students are ready to play these measures at performance tempo, no such tension is needed. The wrist will be loose and able to rotate laterally, which gives support to the fingers and helps them play faster. The music should be practiced at successively higher tempos, and never so fast that the wrist begins to tighten up again:
Practice at a slow tempo:
Practice at a medium tempo:
Practice at performance tempo:
Fast attack and instant release
Whether you’re using Hanon exercises or an actual passage in music, this technique leads to faster playing without the tension. Let’s say you’re working on C.P.E. Bach’s Solfeggietto, an intermediate-level piece that’s all about speed:
At a very slow tempo, play each note with a quick, hard attack and then instantly release any tightness or tension in the wrist:
As soon as each key has been struck with this exaggerated articulation, the wrist and forearm should be relaxed again, with only the weight of the arm holding the key down. You’re learning to use gravity and eliminate wrist locking between each note. As you gradually practice at a higher tempo, use normal articulation like legato and listen for evenness. If you ever feel like your wrists are tightening up again during fast playing, go back to the fast attack method at a slower tempo.
What are some technical exercises to use?
These exercises are some of the most reliable tools for improving finger speed and dexterity, since they target the specific motions you’ll need for fast playing.
The Virtuoso Pianist by Charles-Louis Hanon
Pianist and scholar Hao Huang recommends caution and discernment with exercises like Hanon’s The Virtuoso Pianist. “They are only a means to an end,” he says. “At best, they suggest ways to think about technical problems.” Huang’s advice is to select only the Hanon exercises that address specific challenges in a student’s current repertoire. This way students learn the technique required by actual music, rather than a series of mechanical motions that might never be used.
A student working on Handel’s Prelude in G major, HWV 441 would benefit from Hanon’s Exercises Nos. 5 and 7, since they feature the Baroque figurations and broken thirds that appear in the actual piece:
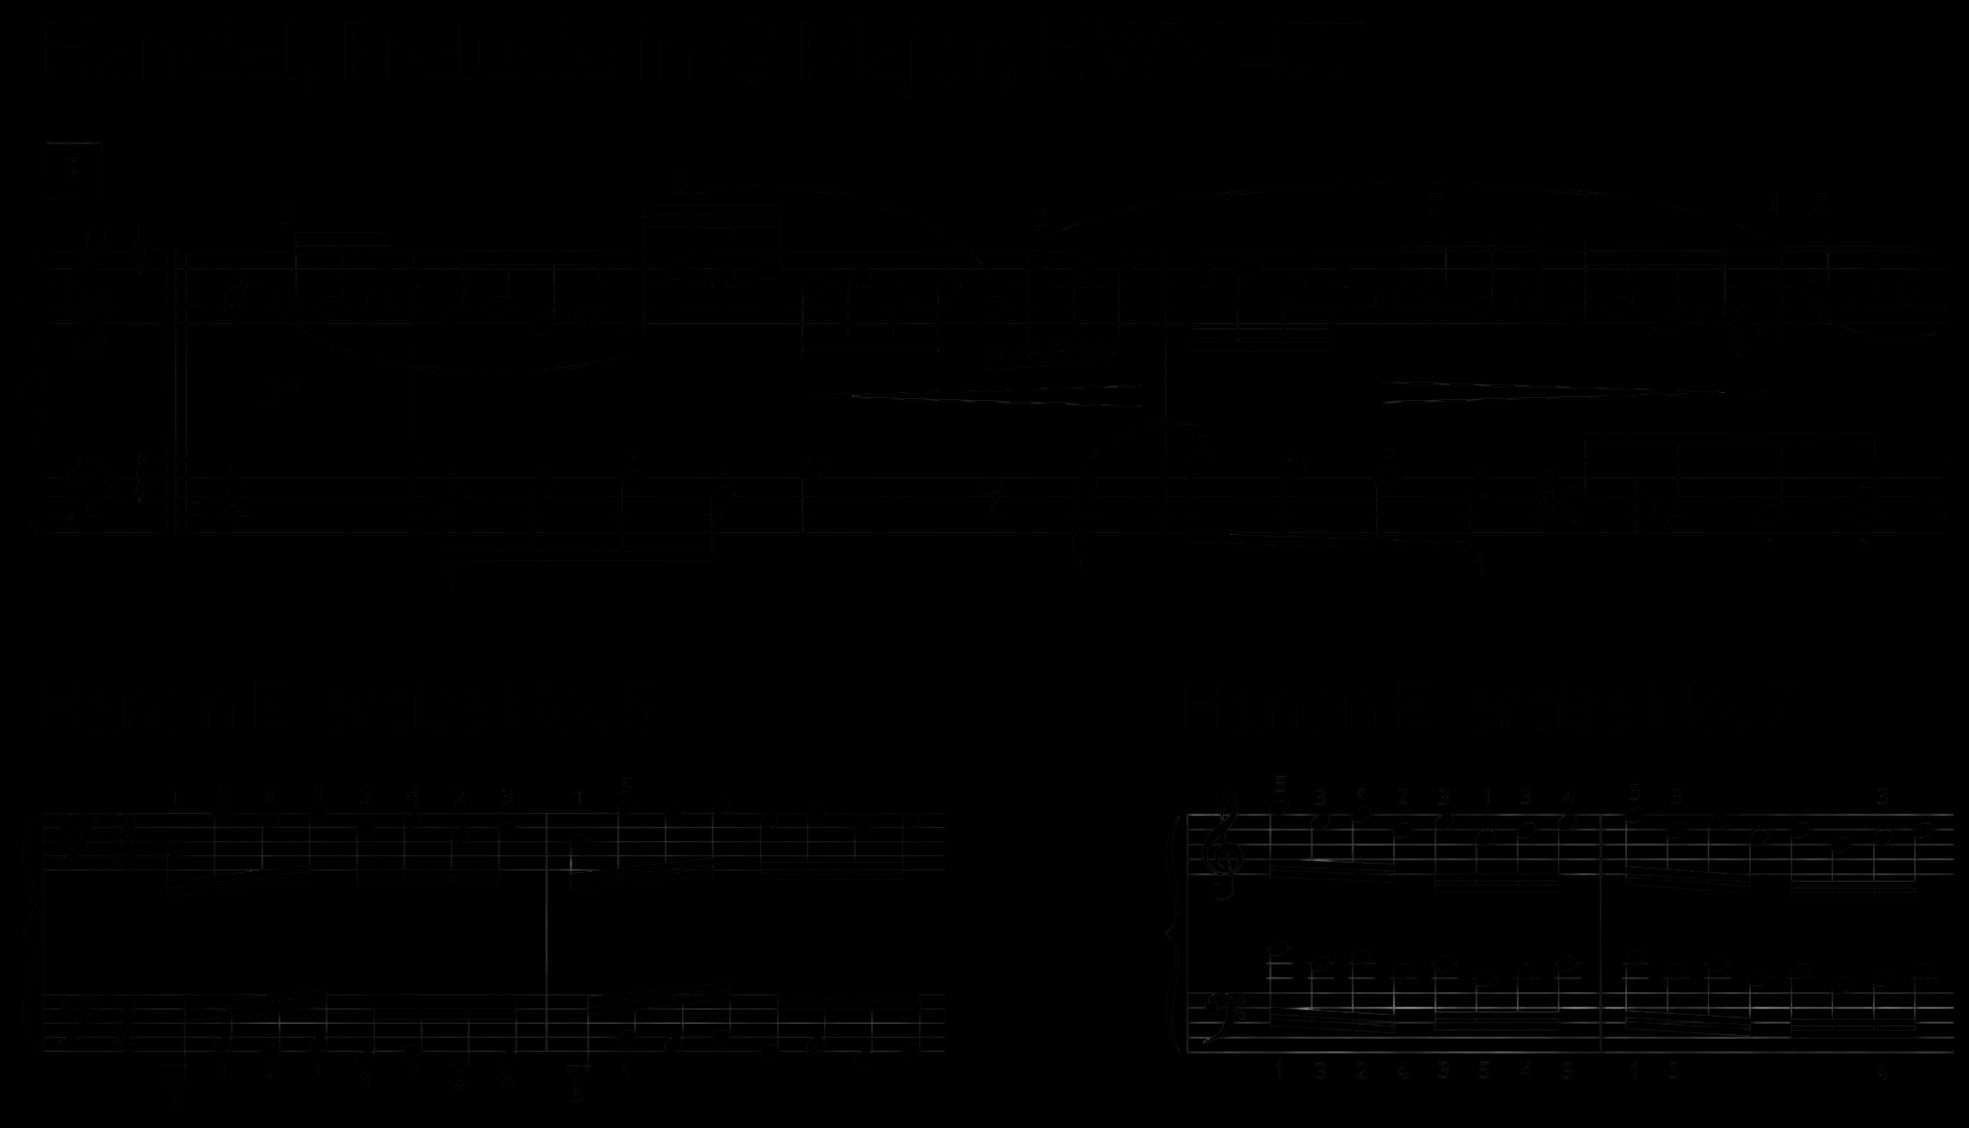
These exercises give the player ample practice at the step-skip alternation specifically called for in the prelude. Over time, they also provide the lateral rotation the wrist needs to stay loose and help the fingers play quickly and evenly.
Scales and arpeggios
In contrast to technical exercises, scales and arpeggios offer techniques used in most music, and they familiarize students with every major and minor key. This makes their consistent practice foundational.
Choose a few major and minor scales and arpeggios each day and practice for at least two octaves. The challenge is to gain speed and smoothness passing the thumb under the hand or the hand over the thumb. Try playing with different rhythm groups for evenness, so that the thumb doesn’t render an unwanted accent. Start with two-note groups separated by a pause, then three, and so on. This helps even out the emphasis on each note:
You can even practice with a swing rhythm for more variety. Try the long––short–long––short rhythm of swing, and then reverse it with short–long––short–long––playing. By changing up your practice rhythms with scales and arpeggios, you help equalize the attack of every finger and improve your control. It all pays off when it’s time to go faster.
How can I train my fingers while not at the piano bench?
Many of the wrist motions essential for assisting the fingers can be practiced away from the piano:
- Find a low tabletop that’s about waist level when you’re seated. Have your knees just barely under the table edge. You’re at the right distance if your forearms are level with the floor. This is the same posture you’ll want when seated at the piano.
- Place your hands on the table with fingers gently curved, and practice raising and dropping your wrists. Be sure that your shoulders don’t rise with the wrists; they should be relaxed and still. Feel the weight of your forearms each time your wrists drop. This is the motion you need to play chords on the piano, with no tightness in the wrists.
- After a few minutes, tap your fingers slowly one by one. Go from the thumb to the little finger and back. Before each finger taps, lift your wrist. The dropping of the wrist should accompany each finger tap, so that the fingers don’t simply tap by themselves.
- You can also practice this wrist-finger assist with any musical pattern, like Hanon exercises or even scales. Try tapping the fingers for a one-octave C major scale, passing the thumb under the third finger and then passing the hand back over the thumb. Continue to lift and drop the wrist to help with each finger tap.
- Finally, tap your fingers to arpeggio patterns. The idea here is to keep your forearm aligned with each finger when it plays. When your left hand plays a one-octave arpeggio from bottom to top with fingers 5-4-2-1, let your forearm and elbow follow the fingers inward. You’ll notice the wrist turns outward as the forearm aligns straight with each finger up to the thumb:
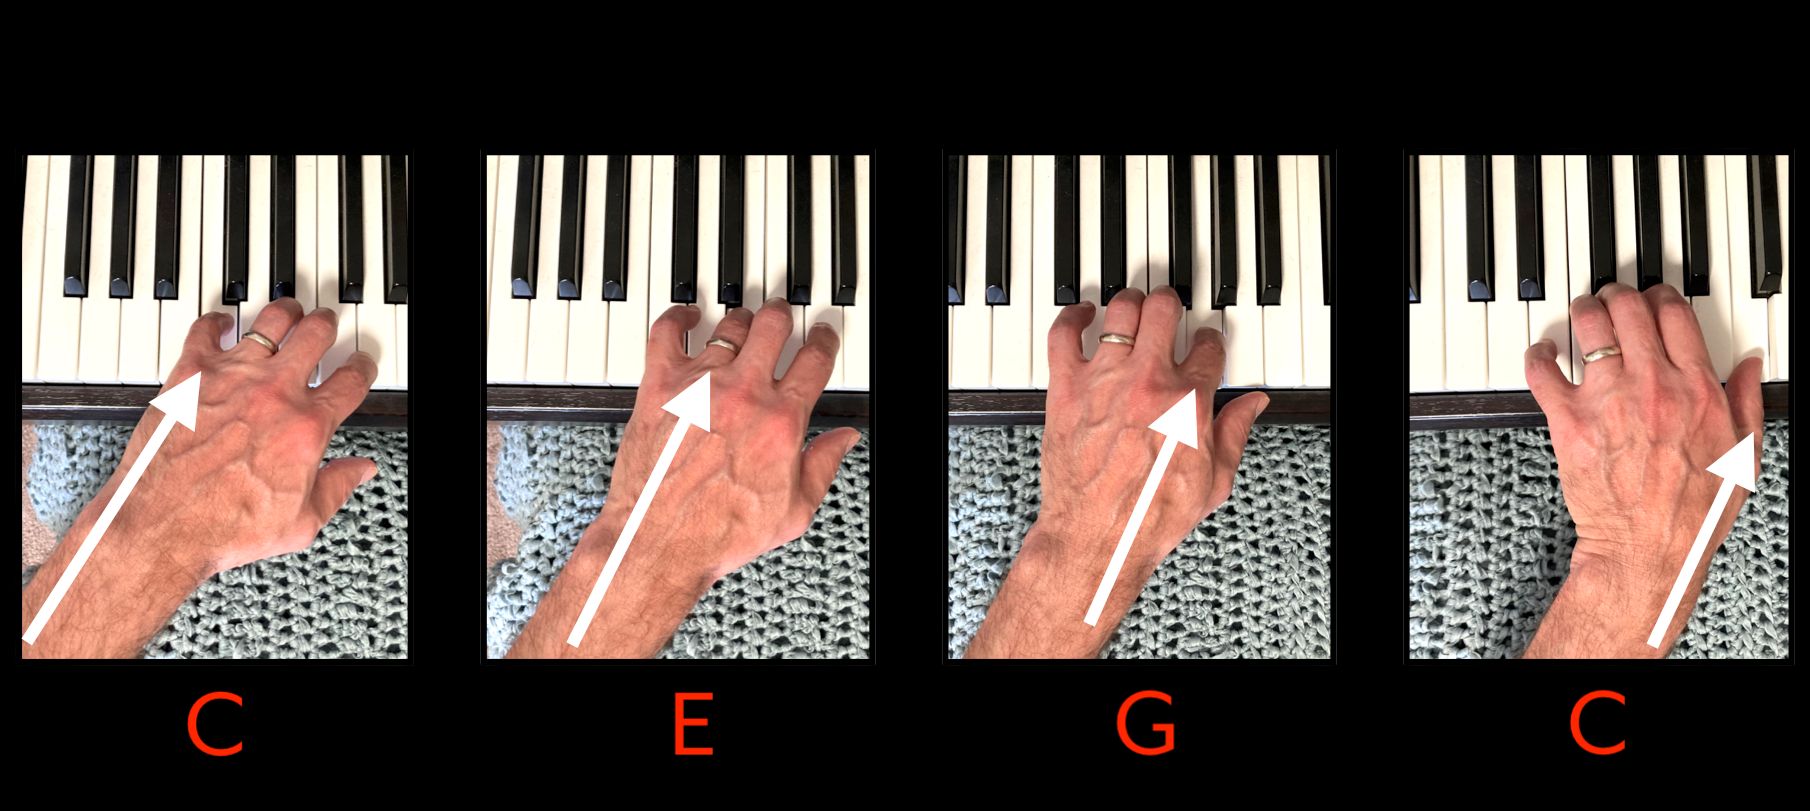
Then try the opposite motion as your fingers go down the arpeggio. The idea is for the arm to push the hand in a fluid gesture, assisting the fingers. On the piano, the resulting arpeggio will sound flowing, rather than punchy and mechanical.
How long does it take to build finger speed and dexterity?
The best answer is: everyone is built differently, and will develop speed at a unique pace. A persistent myth is that the greater a player’s aptitude, the less time it will take to play faster. This is simply not true. Even musicians with natural agility have to gradually build up control and good habits. The next time you see a great live performance, be sure to congratulate the performers not on their talent, but instead on their patience and dedication to long practice. That’s where their agility came from, regardless of talent.
Your fingers will always tell you if you’re playing at a speed you’re ready for. If you notice that you often hesitate between notes, slow your tempo until you can play every note on time with no pauses. By mastering any piece at a slower tempo, you unlock the skill and control to go progressively faster.
What’s the best way to warm up before fast playing?
- Check your posture and be sure you’re at the right distance from the keyboard, with your knees no more than an inch under the edge. Also be sure your chair or bench is at a good height, allowing the keyboard to be at waist level.
- Wrist and finger stretches can improve circulation in the hands, but be gentle. Extend one arm out with the palm up, and then carefully bend the wrist and fingers down and backward with the other hand. Go only as far as is comfortable; feel the stretch, but back off if there’s any discomfort.
- Do some head and shoulder rolls and feel the relaxation in the shoulders. You can also stand, hold your arms out to the side, and let them drop to feel the arm weight.
- Choose a scale or two and play for at least two octaves at different dynamic levels, with staccato and legato articulation, and with different rhythms. Pay attention to wrist rotation and relaxation.
Does hand size affect finger speed and dexterity?
Not at all! The size of your hands plays no role in the agility your fingers can develop. Repetition with proper exercises helps you build the muscle memory needed for fast playing, and this process is not affected by hand size or finger length. Large hands and long fingers do have the advantage of greater spans on the keyboard. Most people can comfortably reach about an octave, but some pianists have enormous spans. While this allows the player to handle larger chords, you don’t need to reach a tenth or a twelfth–the way Sergei Rachmaninoff could–to develop impressive finger speed. Keep in mind that Mozart, also a keyboard virtuoso, could only manage an octave on each hand.

Keep building speed and dexterity over time
Now that you know how to improve piano finger speed and dexterity, remember that piano agility takes patience above all else: patience with both the learning process and yourself. The control and relaxation you need to play fast will come in time with the right practicing. Best of all, you’ll play with speed and comfort by letting your body move the way it was designed to.